10 Natural Makeup Tips for a Luminous Glow
- Brighten Your Base. Prep your skin while improving texture and tone over time with a hard-working primer. ...
- Give Foundation a Glow-Up. ...
- Go Light on the Concealer. ...
- Achieve a Rosy Flush. ...
- Brush Up Your Brows. ...
- Create Subtle Smokey Eyes. ...
- Soften Up Your Eyeliner. ...
- Try a New Mascara Shade.Get the perfect natural makeup look (also known as the no makeup-makeup look) is all about finding the balance between glowing I-woke-up-like this skin and a perfectly bushy brow. Contrary to its name, the no-makeup makeup look actually requires a decent amount of makeup and steps but there are certain steps you can live without. Below, we’ve rounded up the key steps to nailing the natural makeup look — feel free to tweak the look to make it work for you.
STEP 1: Prep
Apply a thin layer of moisturizer to prep your skin for makeup. Making sure your skin is hydrated and plump before makeup application is key to making your makeup look like real, natural skin.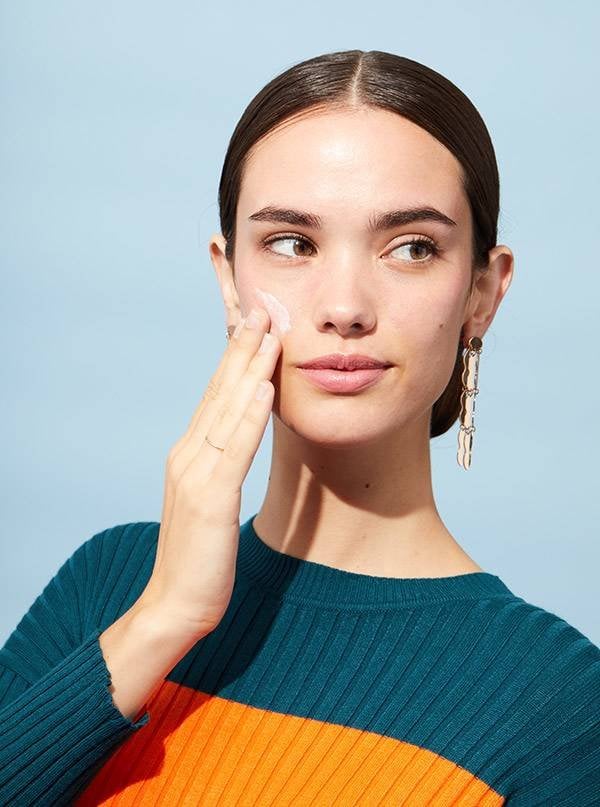
STEP 2: Base
Apply a light to medium coverage foundation or BB cream like IT Cosmetics Your Skin But Better CC+ Cream with SPF 50+, stippling it on with a blending sponge or flat brush. This makeup hack for long-lasting foundation will help ensure that your face makeup stays intact from day into night. If you want a seamlessly blended finish, go over your face with a damp beauty sponge to ensure there are no streaks or lines. If you need it, pat concealer under eyes (we recommend Maybelline Age Rewind Concealer). Choose one that is one to two shades lighter than your natural foundation color to brighten up the under eye area and cover up any discoloration and dark circles. For a more luminous look, apply concealer to your forehead, the bridge of you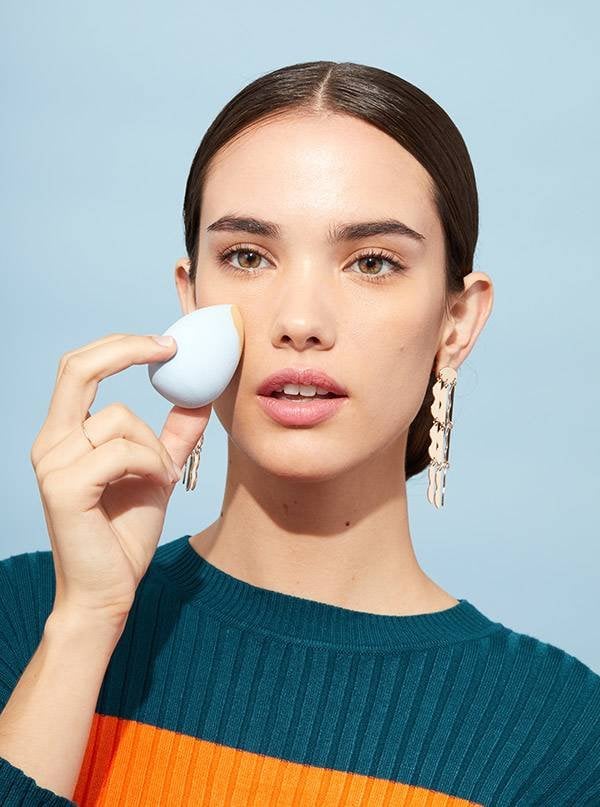
STEP 3: Cheeks
Sweep blush onto the apples of your cheeks to give your face some extra color. Continue to blend this out so that the color is not too concentrated in one area. For a natural finish, you’ll want the blush to look soft and diffused like the Shu Uemura Fresh Cushion Blush. Warm up your skin tone with a bronzer of your choice (we like Urban Decay Naked Flushed). Apply this under your cheekbones and along your temples and jawline.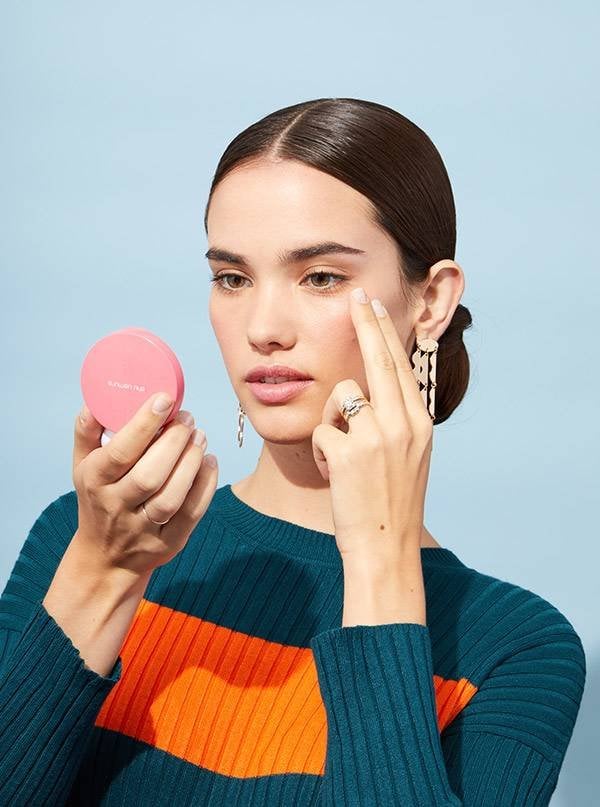
STEP 4: Eyebrows
Spoolie your brows, and fill them in with a brow product of your choice. Powders give a diffused, natural look while pencils are more precise. We recommend the NYX Professional Makeup Micro Brow Pencil for most brows — it makes creating hair-like strokes a breeze.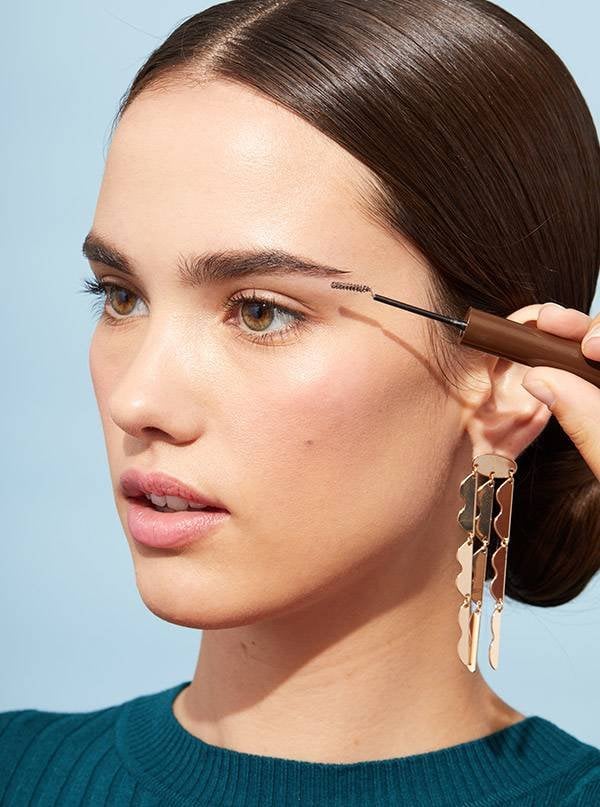
STEP 5: Eyes
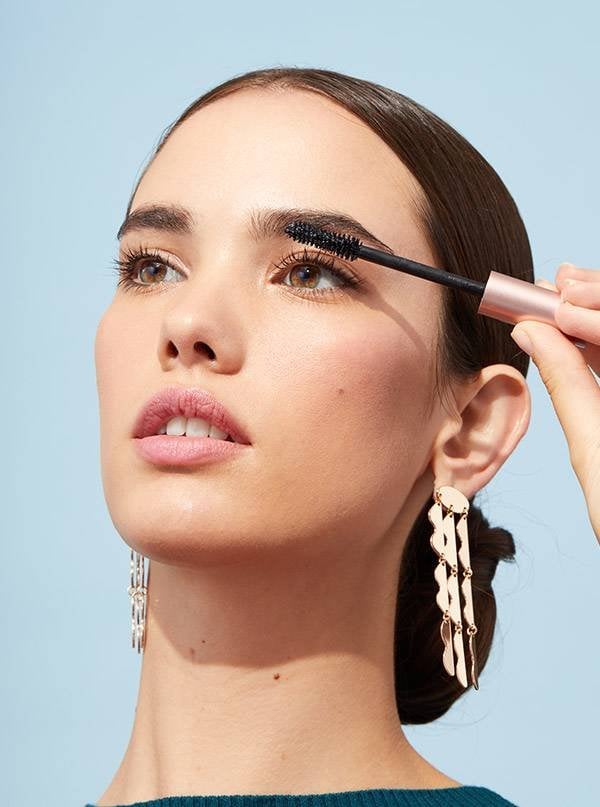
Apply a warm eyeshadow shade to your crease, then swipe a neutral shade across the lower lid. Blend, blend, blend! For this step we recommend a palette with lots of matte brown shades so you can experiment with tones and colors that work for you like NYX Warm Neutrals Ultimate Shadow Palette — it’s perfect for beginners and a quality, affordable option. Apply a single coat of mascara to the top and bottom lashes, being sure to wiggle your wand vertically to get every single lash.
STEP 6: Lips
Finish the look with a pink or nude lip gloss that compliments your skin tone. For this step, give YSL Volupté Tint in Oil a try — it comes in eight pretty shades so you’re bound to find oneWhen it comes to applying makeup like a pro, there is a general order you should follow to achieve the best end results. However, different things work for different people, so there isn’t just one perfect way to apply makeup. And if you’re struggling with finding a method or wondering whether you should use concealer before or after foundation, you’ve come to the right place. To help you nail down a good makeup application flow, we’ve created a step-by-step guide you can use to learn how to apply face, eye, and lip makeup. We’ve also included product recommendations for the best foundations, mascaras, and more.
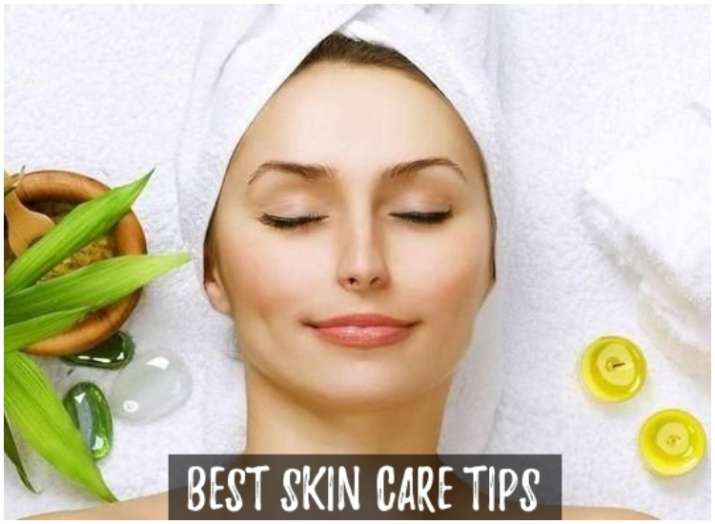
How To Prep Your Face For Makeup
Before applying makeup, it’s important to prep your skin to create a good base. So be sure to complete your skin care routine before reaching for any makeup tools. Check out our three tips below for a quick and easy skin care prep routine.
Step 1: Facial Cleanser
The first step in your skin care routine should be washing your face. Reach for a facial cleanser, like the L'Oréal Paris Revitalift Bright Reveal Brightening Daily Scrub Cleanser, formulated with gentle micro-pearls and glycolic acid to help exfoliate and reveal brighter skin. It cleanses the skin without leaving it feeling dry and stiff. Squeeze a small amount of product into wet hands then gently massage it onto your skin and rinse off thoroughly.
Step 2: Facial Serum
Regardless of your skin type, adding a facial serum to your skin care routine could be very beneficial to the look of your complexion. Use the L'Oréal Paris Age Perfect Cell Renewal Midnight Serum, formulated with an exclusive antioxidant recovery complex that helps boost the skin’s renewal process overnight. It also contains hyaluronic acid—a powerful hydrating ingredient that helps lock in moisture to keep the skin hydrated. Right after cleansing, apply three to four drops of this serum in the morning (yup, you can use it in the daytime) and night to help improve radiance and firmness in the skin.
Step 3: Moisturizer
Finish off your skin care routine by using a moisturizer that’s formulated for your skin type. Grab the L'Oréal Paris Hydra Genius Daily Liquid Care for Normal/Oily Skin, L'Oréal Paris Hydra Genius Daily Liquid Care for Normal/Dry Skin, or L'Oréal Paris Hydra Genius Daily Liquid Care for Extra Dry Skin. Each of these moisturizers is formulated with hyaluronic acid and aloe vera water for long-lasting hydration.
The Best Order To Apply Face Makeup
After completing your skin care routine, you can begin the makeup process. And if you’re wondering if it’s necessary to use a primer or not sure if concealer should come before or after foundation—we can help. Check out our step-by-step guide below for an easy-to-do makeup routine.
Step 1: Apply A Primer
Using a primer is key to creating a great base for your beauty look, as it provides a grip for the products and works to extend the wear of your makeup. If you have dry skin grab the L'Oréal Paris Infallible Pro Glow Lock Makeup Primer, which will help give you a glowing finish. For those with oily skin reach for the L'Oréal Paris Infallible Pro Matte Lock Makeup Primer, formulated to mattify your complexion.
Step 2: Color Correct
Have dark under-eye circles or redness you want to cover up? Use a color correcting concealer, like the L'Oréal Paris True Match Color Correcting Crayons, which work to neutralize color and transform complexions. Simply blend a small amount of color-correcting concealer onto targeted areas of the skin using your ring finger.
Step 3: Apply Foundation
Foundation is among the few makeup essentials that you don’t want others to see, meaning it’s supposed to look just like your skin but better. So be sure to choose a formula that suits your specific needs. For example, if you have oily skin, you may want to consider using a matte (a.k.a. non-shiny) finish foundation, like the L'Oréal Paris Infallible Up to 24H Fresh Wear in a Powder, matte finish. Its breathable and weightless formula stays put for up to 24 hours. The best part? It’s waterproof and sweatproof, so you won’t have to worry about touch-ups throughout the day.
For those with dry skin, grab a radiant finish foundation, like the L'Oréal Paris Infallible Pro-Glow Foundation, which has a hydrating formula that will help give the skin a glowy look for up to 24 hours. Use a damp makeup blender like the L'Oréal Paris Infallible Blend Artist Foundation Blender when applying foundation to get even and natural-looking coverage.
Step 4: Conceal Your Under Eyes
Next, apply concealer under your eyes and over any blemishes. Foundation does a good job of covering up, but concealer can target any stubborn imperfections and make them nearly non-existent. For a full-coverage option, try L'Oréal Paris Infallible Full Wear Concealer Waterproof, Full Coverage, which comes in 25 various shades to match every skin tone and undertone. Use the included applicator to blend and buff the concealer into your skin.
For those looking to specifically cover up dark under-eye circles, use the L'Oréal Paris True Match Eye Cream in a Concealer, 0.5% hyaluronic acid. This multitasking product provides 24 hour hydration that works to keep the eye area looking fresh and brighter, thanks to its dose of pure hyaluronic acid.
Step 5: Contour To Add Dimension To Your Face
Now that you’ve created an even foundation base, it’s time to add dimension by chiseling out your cheekbones and jawlines with some contour. Pick out a contour shade from the L’Oréal Paris Infallible Longwear Shaping Foundation Makeup Sticks, which have a creamy, glide-on formula that easily blends into the skin.
Step 6: Add Some Glow
Get your glow on or fake a rosy tone by applying a little bronzer, blush, and highlighter. Reach for the L'Oréal Paris True Match Glow Nude Highlighter Palette, which includes all three products. For bronzer and highlighter, apply them on areas where the sun would naturally hit your face (your forehead, nose, cheeks, and chin). Use a fluffy brush to apply the blush to the apples of your cheeks—and remember to smile while doing so! This will help give you a nice placement and add a pop of color to the cheeks.
The Best Order To Apply Eye Makeup
Now, it’s time to move on to the eyes—grab your eyebrow pencil, eye shadow, mascara, and get ready to work!
Step 1: Define Your Eyebrows
Sculpt and define your eyebrows using the L'Oréal Paris Brow Stylist Waterproof Eyebrow Mechanical Pencil or the L’Oréal Paris Unbelievabrow Longwear Waterproof Gel. Both products will work to create a natural-looking well-defined arch.
Step 2: Add Color Your Lids
When applying eyeshadow, first, dust color onto your lids, then follow up with a crease color, and place a dab of highlighter along your brow bone. For a neutral eye makeup look, use the L'Oréal Paris Colour Riche Pocket Palette Eyeshadow in Boudoir Charme; for a shimmery nighttime eye makeup look, try the L'Oréal Paris Brilliant Eyes Shimmer Liquid Eye Shadow Makeup.
Step 3: Line Your Eyes
We’ve found that it’s easiest to apply eyeliner before mascara and after eyeshadow. Reach for a waterproof eyeliner, like the L'Oréal Paris Infallible Pro-Last Waterproof Pencil Eyeliner. You can even use this eyeliner in your waterline (this technique is called tightlining) for added definition.
Step 4: Mascara
Finally, go for big bold lashes by using the L’Oréal Paris Air Volume Mega Mascara Lightweight Mega Volume Washable. This mascara features a cushioned double-bristle brush—the short side catches lashes from the root and the long side helps spread the product evenly for fully blown out lashes. Thanks to its air-whipped formula, your lashes won’t feel weighed down.
The Best Order To Apply Lip Makeup
You’re almost at the end! After you’ve finished your face and eye makeup, show your lips some love by swiping on some color.
Step 1: Lip Liner
Before you apply lipstick, use a lip liner to help prevent color from bleeding, which happens when your lipstick runs or smudges outside of your lip lines. Choose a lip liner and outline the natural line of your lips to help make your pout look fuller. You can also color in your lips with liner before applying lipstick to help create a smooth base. Try the L'Oréal Paris Colour Riche Lip Liner or L'Oréal Paris Colour Riche Matte Lip Liner based on the finish of the lipstick you choose.
Step 2: Lipstick
Next, swipe on your lipstick. With so many different colors and formulas available, the possibilities are nearly endless. Whether you opt for something shiny, like the L'Oréal Paris Brilliant Signature Shiny Lip Stain Lipstick, a matte formula like the L'Oréal Paris Colour Riche Ultra Matte Highly Pigmented Nude Lipstick, or something super pigmented like the L'Oréal Paris Colour Riche Les Nus by Colour Riche Intense Nude Lipstick, your pout is sure to look stunning.
How To Set Your Makeup Look
After all your work, it’s essential to set your makeup to ensure that it stays in place and lasts throughout the day. Apply a few spritzes of the L'Oréal Paris Infallible Pro-Spray & Makeup Extender Setting Spray, formulated to set and prevent your makeup from settling into fine lines.
Shake well and hold the bottle about eight inches away from your face. Close your eyes and spray it four to six times in an X and T motion.
How To Remove Your Makeup At The End Of The Day
Sleeping in your makeup can lead to clogged pores—and clogged pores can lead to breakouts. So make sure to remove your makeup by using the L'Oréal Paris Micellar Cleansing Water Complete Cleanser Waterproof – All Skin Types. It will help lift dirt and oil from the skin so you don’t lay foundation over bacteria that can cause breakouts. There’s also no rinsing required, making it ideal for a quick cleanse. Pour some of the product onto a cotton pad, wipe the pad across you
No matter how amazing your beauty products are if you don’t have the right brushes and tools to apply them, your makeup might still come out looking subpar. A great face all comes down to application. There are quite a few types of brushes and makeup blenders out there that can help you bring your favorite makeup looks to life. And once you’re familiar with which brush is the best for what, it will make perfecting your makeup a whole lot easier. Here, our comprehensive makeup brush guide will help you get acquainted with all the best tools.
The Best Foundation Brushes
When it comes to laying down face products, you want to use one of these tools for getting an even, streak-free finish.
The Blender SpongeWhy apply your foundation with your fingers when a makeup blender can help you be so much more precise—not to mention more hygienic. Try the L’Oréal Paris Infallible Blend Artist Foundation Blender, which has a pointed tip and a rounded bottom for easy application. Apply a small amount of foundation using the sponge's pointed tip, then bounce the rounded bottom all over your face to blend and build coverage.
The Foundation Brush
Speaking of applying foundation, this flat, elongated brush is specifically meant for foundation application. The dense bristles make it easy to build coverage—and who doesn’t want that? Alternatively, this brush can be used to smooth on a makeup primer at the start of your routine.
The Oval Brush
If you haven’t heard about the oval makeup brush trend by now, allow us to introduce you. This brush is also known as a toothbrush makeup brush since its shape resembles a toothbrush with a handle and bristles on only one side of the brush. Extremely dense, it’s ideal for applying foundation, concealer, and other cream and liquid products if you want an airbrushed finish.
The Stippling Brush
You may already be familiar with stippling from using makeup blenders, but there are also brushes devoted to it. This method of application involves bouncing your tool up and down on your skin to get a super flawless finish. A stippling brush, complete with densely packed bristles, is perfect for applying foundation, but can also be used to apply blush and other face makeup products. If you love the concept of a makeup blender but prefer the control of a handle, consider this option.
The Powder Brush
Finishing off a full face with a makeup setting spray or powder can help set your look. When using powder specifically, apply it with a fluffy powder brush—and use a light hand! If you’re branching out into more complicated beauty trends, you can also use a powder brush to dust off your face after giving makeup baking a try.
The Best Blush and Contouring BrushesApplying blush and contour the right way (read: so that your makeup doesn’t look overdone and costume-like) calls for special brushes that get the job done right.
The Blush BrushThis brush looks like a more compact, elongated powder brush. The bristles tend to be densely-packed in order to help you apply cheek color with precision. All you have to do is smile and apply the blush of your choice to the apples of your cheeks in short, outward strokes.
The Contour Brush
Available in an array of different sizes, large angled brushes are best for contouring. The densely-packed bristles make it easy to achieve prominent, precise application. You’ll be able to create perfectly chiseled-looking cheekbones in no time!
The Bronzer Brush
Perhaps you don’t want to full-out contour but simply want to warm up your complexion. That’s where this bronzer brush comes in. Similar to the blush brush but slightly denser, it’s ideal for outlining your natural face shape and getting a sun-kissed look.
The Domed Stippling Brush
As you can probably guess, this brush is nearly identical to a traditional stippling brush—aside from its domed edges. The curve of this brush makes it amazing for curves on your face, which means it can be used to contour. Use it with a liquid bronzer and you’ll never turn back.
The Flat Concealer Brush
Have dark circles in need of disguising? This small, flat brush with rounded bristles can be used to apply concealer under your eyes. It can also be used for precise concealer application on other parts of the face, including to cover blemishes or clean up your lip look.
The Fan Brush
Never understood how to use highlighter without resembling a disco ball? Get your hands on a fan brush, which has soft, flat, fanned-out bristles that allow you to sweep on just enough shimmer.
The Tapered Highlighter Brush
Prefer a more precise and defined highlight? Look no further than a tapered highlighter brush. This face brush can be used to expertly pinpoint where you want shimmer, whether that is your cupid’s bow or the tip of your nose.
The Best Eye Makeup BrushesGet ready to create eye-catching looks with this array of brushes made specifically to get you there.
The Shader BrushUsed for almost every eye shadow application, this brush is mostly known for allowing you to dust on an all-over color. You can find shader brushes in multiple sizes, but the smaller you go, the more precise you can get with your application.
The Large Shader Brush
Speaking of varying sizes of shader brushes, a large shader brush, in particular, is probably the one you’re most used to seeing. This brush is typically used to pack all-over color onto your lids and serves as a tool for creating the base of nearly every eye makeup look.
The Fluffy Blending Brush
If you want to use multiple eyeshadow shades, with each one fading flawlessly into the next, a fluffy blending brush should be in your arsenal. The loosely-packed bristles can help you seamlessly blend your eyeshadow, putting an end to any harsh lines.
The Angled Crease Brush
To create a defined eye crease, pick up an angled crease brush. The angled bristles can help you sweep eyeshadow effortlessly into your crease to add depth to your look. These little multi-taskers are also ideal for swiping shadow beneath the arch of your brow.
The Small Blending Brush
Small blending brushes are perfect for applying cream eyeshadows thanks to their densely-packed bristles. They can also be used for—you guessed it—small areas that need blending, such as smudging shadow along your lower lash line.
The Firm Blender Brush
So, you want to blend your eyeshadow but also want to keep each individual shade intact. A firm blender brush will be your go-to tool, as its more compact bristles are perfect for precise blending that won’t take away from each hue used.
The Pencil Eye Brush
Want to line your lash line with a shadow or highlight your inner corner? A pencil brush will come in handy for that. This small, rounded brush makes it easy to expertly place shadow in a specific, tiny area.
The Small Angled Brush
You may be used to seeing this brush on the other end of a spoolie (more on that later). This eye makeup brush can be used to paint on eyeliner or fill in your brows. The thin, flat edge is perfect for drawing sharp lines.
The Double-ended Spoolie
Like we mentioned, you might recognize small angled brushes often come on the other end of this tool: the spoolie. This eyebrow tool is a must for anyone who wants perfectly groomed brows, as the spoolie can be used to brush and tame brow hairs while the small angled brush expertly draws on brow hairs to fill in sparse areas. A spoolie can also be used to brush through lash extensions.
The Best Lip Brushes
In case you haven’t tried it yet, applying lip products with a brush is clutch for precision and packing on color. Try one of these to complete your favorite lip look.
The Basic Lip BrushFor better lipstick application, don’t apply color straight from the tube—use a basic lip brush. The small shape is extremely helpful when it comes to coloring inside the lines.
The Precision Lip Brush
Want a bit more control? If you’re looking to outline your lip shape—or line slightly outside your lips to fake the appearance of a fuller pout—a precision lip brush will come in handy.


No comments:
Post a Comment